
That said, here's, my guide to building a forest pond themed flying base.
To start with, you will need some inspiration. Unless you're one of those incredible artistic, creative types who can just like, you know, 'imagine' stuff and then create it, its a good idea to do a bit of photo research.
A lot of us like to just wing it. Whether its because we think that is how genuine creative geniuses work (its not) and that we too are so gifted (we're probably not), or we just don't think we have the capacity to or patience to plan out something great, there's really no excuse, what with Google image search being so easy and available, to not at least type in 'forest pond'. Doing so will give you images like this:

Alright - there we go. The idea of layered rocks forming a sort of bracket for the water on at least one side is one I probably would not have had otherwise. The sloping effect is also something cool I can try.
Using some GW textured paint and some pieces of slate I found on the road, we can get something like this:
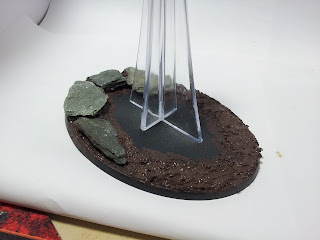
I'm trying to build up a sort of beachy slope in the foreground. I have also made sure to seal all the gaps between the rocks at their bases so as not to let any of the water effects through when I add them later on.
The textured paint is pretty versatile stuff. As well as giving you a pre-textured and pre-basecoated base, it will dry to form a fairly strong grip on the slates I pushed into it when wet. It is not super-easy to sculpt or shape, but with a little perseverance you can get some good slopes, pits, ridges, and so on.
It takes maybe an hour to dry though, so I will leave it for a while before adding some more layers and rocks.
No comments:
Post a Comment